
Hey y'all! Aymee Gandy of 'A Scraphappy Southernbelle' here with you on this beautiful day to share a new card I have created. I know you are thinking with that blog post title, what on Earth is Aymee thinking? Or you might be thinking...'Is Aymee pregnant?' LOL! Well, no I am NOT pregnant. It is not my turn just yet. But I am so excited to announce that I am going to be an aunt again! My brother and his wife have announced that they are expecting their second child next April! Brandon and I are so excited! We can't wait to spoil the new baby!
So in honor of their new arrival I have created a card to congratulate them. I really wanted them to know how excited we are and to make them laugh. I have had this idea for a 'bun in the oven' card for quite some time. I'm so glad I finally got to try it out. I used my Gypsy to design the card and my Cricut to cut it out. Here is what I will be sharing with you today:
"Bun In The Oven" Card
Supplies Used
Cardstock: The Paper Studio, Bazzill Basics Paper
Patterned Paper, Die Cuts: Colorbok
Pearls: Queen & Co
Twine: My Craft Spot
Ink: ColorBox (Clearsnap)
Electronic Cutter: Cricut Expression (Provo Craft)
Cartridges: Gypsy Wanderings (card base/card front), Wild Card (sentiment), New Arrival (baby), From My Kitchn (oven), Simply Charmed (bun)
Software: Cricut Gypsy (Provo Craft)
Adhesive: Helmar
Velcro

See how the oven door opens to reveal the 'bun?' Tee Hee!

Now, let me share with you how easy this was to do!
When you cut out your oven using the 'From My Kitchen' cartridge, you will want to cut out each piece as shown below PLUS 2 extra of the shadow behind the 'oven door'. You will cut one of them out in white and one black. (or the colors of your choice)

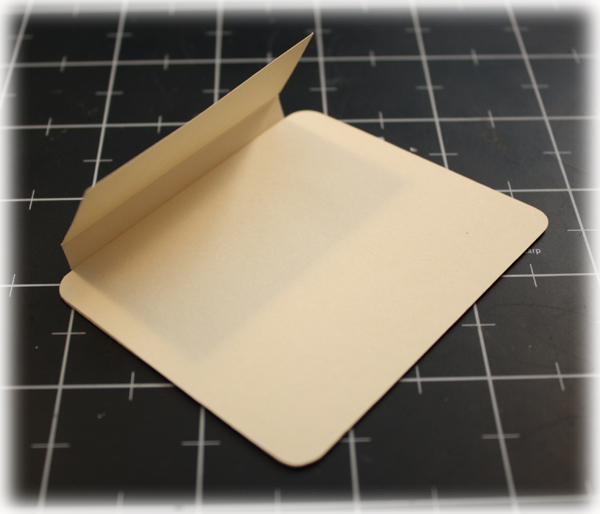
To create the opening mechanism, start with the oven door and a basic 'U' shaped cardstock hinge. I created my hinge out of leftover white cardstock I had from cutting. I used my bone folder and the groove in my paper trimmer to score some lines. It does not have to be perfect. Most of the hinge will be hidden from view.

Flip the oven door over on its backside and center the hinge as shown. Notice, you will be able to see the hinge. Well this is unsightly to the finished card, but never fear....

Remember the extra white piece we cut, adhere this over the top. This will help to hide it.
Repeat the process as shown below for the 'inside' of the oven....

Cover up the unsightly hinge with the extra 'inside oven' piece I mentioned earlier that you need to cut.

You will be left with something like this...

Now, to keep the oven door shut when not in use, I used a velcro dot. It works great and is pretty strong. I think craft magnets would work good for this type of project as well, so use whatever you have. You could even use repositionable adhesive if need be.

And you'll be left with something like this...voila'!!!

I added a die cut and a twine bow to the front of my oven.

Here is a view to show you the dimension of this card...
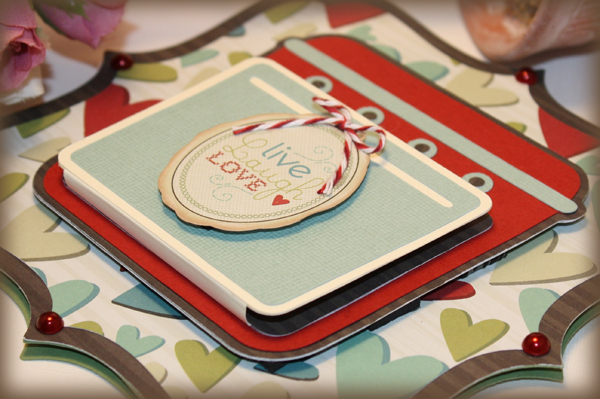
I decorated the inside of my card too.

This 'Congrats' is from the Wild Card cartridge and the baby is from New Arrival.

For the back, I used another die cut and my personalized stamp.

I hope you have enjoyed this card today and that you'll give it a try! It really was very easy to create!
Have a fabulous day! Happy Scrappin'!!!

Wow Aymee that card is ah-may-zing!! Great job!! Sure the happy couple will treasure it forever :)
ReplyDeletewow, this is so cute! great design!
ReplyDeleteAymee,
ReplyDeleteThis is so adorable! Congrats Auntie!!!